Lora's Beauty Website


For handcrafted soap visit the online store or the Etsy Store!

Lora's artisan soaps, an affordable luxury.

Thursday, September 26, 2019

Eco Friendly Shampoo and Conditioner For Healthy Hair and a Discussion about pH

It's taken a while and I've learned a lot about pH levels, but I finally have created a shampoo bar that I feel is worthy of carrying the Lora's Beauty name!

The Aloe Vera and Avocado Shampoo Bar combined with the new Cocoa Butter Conditioner Bar make for a pH neutrilizing hair care solution without plastic bottles!

Before I deep dive into my new shampoo bar, let's talk about pH. pH is measured on a scale of 0-14 with 7 being neutral, below 7 being acidic, and above 7 being alkaline (basic). Handmade soap, if made correctly, is a base on the pH scale, clocking in anywhere between 8-11. Your skin doesn't have a pH but your skin's acid mantle does and it falls within 4.5 and 6.2 depending on a lot of factors such as race, gender, ethnicity, etc.

There's been a lot of talk recently about pH and the skin's acid mantle and how using a cleanser that has a pH closer to your acid mantle is better for your skin. Unfortunately, in order to make a cleanser like that, a lot of synthetic ingredients are needed. Ingredients that aren't healthy for your skin otherwise. Handmade soap made correctly and with quality ingredients is made with beneficial oils and butters that skin loves. Yes, the pH level is higher, however, remember that water, something the skin is exposed to when bathing and showering, is a pH of 7-8.5 depending on where you live.

The point is, disrupting the skin's acid mantle with a quality handmade soap is rubbish. First off, soap isn't meant to sit on your skin, it's meant to be rinsed off and second, knowing that the skin does absorb into the body what you put on it, would you rather have the skin absorb harsh synthetic chemicals or natural oils and creamy butters? Oh, and third, measuring exact pH (not just determining if something is an acid or a base), as I've now learned, isn't that easy. So chances are that really expensive synthetic cleanser claiming to be a perfect pH match for your skin, is in fact not.


All of this brings me back to my new Shampoo Bar. Human hair and scalp oil has a natural pH of 4.5 to 5.5. Unlike the skin though, there seems to be a consensus that using a more neutral pH cleanser on your hair is beneficial. The acidic pH of your hair keeps the cuticle closed and healthy.
Again, shampoo is meant to be rinsed off with water that has a pH of 7 - 8.5, however, using too basic of a cleanser on your hair could cause the cuticle to open and break easier.

In an attempt to create a shampoo bar with a lower pH, I spent time doing research and I found a lot of conflicting information, not surprisingly. Finally, I decided to just start experimenting myself.

Knowing that handcrafted soap was alkaline, I decided to add an acid to my soap right before pouring it into the mold. I had seen from other people's writings that adding citric acid once the soap had achieved trace (when the oils and lye water have emulsified) would not cause the soap to fail and would bring the pH down some. It was important to get the timing right though. Adding it too soon or adding too much and you could end up with a gloppy mess.


I'm happy to report that on my first attempt I was able to not destroy the soap! I still felt the bars were a little too alkaline so I tried again with even more citric acid. The second time yielded a bar I was much happier with and paired with my new Cocoa Butter Conditioner bar, which has an acidic pH, I found a neutralizing solution for hair! I've been using this combination now for a couple of weeks and my hair feels very soft and manageable.


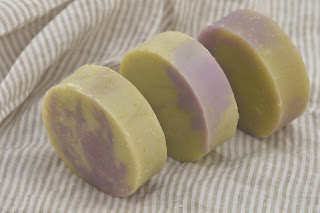
The Aloe Vera Avocado Shampoo Bars shampoo bars are made with aloe vera water, avocado butter, and the nourishing oils of castor, olive, and rice bran as well as citric acid. French green clay, ground spinach powder, activated charcoal, or ground papaya seeds are added to naturally color the bars.


The Cocoa Butter Conditioner Bar is made with BTMS 50/50 (a conditioning emulsifier), cocoa butter, olive oil, castor oil, and scented with essential oils. The preservative glycine-benzoic acid, a paraben free preservative, is added to discourage mold growth since the bar will be exposed to water.

Currently, I'm selling these bars separately but they really are meant to be used together for a healthy, neutralizing hair care solution that's plastic free!
Tuesday, September 10, 2019

It's Here!

It's hard to believe but a few weeks ago the wonderful, life-changing purchase I made back in February finally arrived!

My new Vanmoof X2 electric bike!

I worked from home that day and even took the afternoon off so I could put it together.

There were videos to watch to help assemble the bike. Here I am at step 2, removing the packaging. Step one was remove the bike from the box; check!

So far so good, we have power! The display, showing number of bars of power and speedometer, is embedded in the top tube.

After installing the front wheel and pedals, raising the seat and turning the handlebars around, I'm ready to get the bike app! Yes, there's an app. It works as an option to lock/unlock the bike, set the alarm, and shows the location of the bike, among other things.

The bike is a pedal assist so it won't move unless I pedal and the motor, which is in the front wheel hub, won't propel you past 20 mph.
Look how happy I am and that was before I had even ridden the bike! Now, after several weeks of ownership I still have a smile on my face each time I take off on it.


Friday, August 2, 2019

Lora's Beauty on Etsy!

You read that headline correct! Lora's Beauty is now on Etsy!!

Yes, you can still purchase all the great Lora's Beauty soaps on the original website and now you can opt to shop on Etsy as well.

I get it, it's hard to go to a small business's website and enter all your billing information to make a purchase. Although Lora's Beauty continues to use and has always used state of the art shopping carts that protect your personal information, I know, it's still hard. That's why we've branched out to Etsy; in the hopes that you feel more comfortable working within the Etsy website.

Lora's Beauty soaps on Etsy will still offer Free Shipping inside the US on purchase $35 or more and on the off chance you want to pick up a new soap dish or new dress from another Etsy site with your bars of soap, you can do that by just adding them to your cart!

On both the original site and the Etsy site, I'm offering a new round bar of the always popular Cinnamon&Honey Goats' Milk Soap for just $4!

This is the perfect shaped and sized bar for your gym bag or travel bag!

So take a look, follow my shop, order a few bars, and please leave me a review!

Friday, June 7, 2019

5 Things Lately

Hello, yeah it's been a while. Not much, how 'bout you? Can't get that song out of your head now, huh?

Anyway, just a brief check in to share what's going on at Lora's Beauty. As some of you know who follow me on Instagram (click here to follow me), I made a quick trip to Alaska last month. I went to see my son and take in the beauty that is Seward, Alaska.

Wow! Is it ever beautiful! 

Surrounded by the Kenai Mountains, Seward sits on Resurrection Bay in the Gulf of Alaska. I'm adding these photos unfiltered and unedited.

I went with my mom and we saw Alec's ship!

Someone told me that Alaska was a lot like Oregon only everything is just bigger. I couldn't agree more, I mean look at those mushrooms!
Unfortunately, on our next to the last day there, Alec went underway. However, this afforded me the opportunity to get a photo of the ship leaving the bay. Doesn't it look so tiny?

I'm headed back to Seward in July and this time I'll bring a new camera lens so I can zoom in better on the wildlife and the ships.

Meanwhile, back in Portland, we've got the garden planted and have even harvested a little from it such as the romaine lettuce I used to make this smoked salmon (from Alaska of course) salad.

Because of the garden and the fact that the lettuce is ready, we've been eating our fair share of salads and to make them more of a meal I'm all about the extras, like salmon (or tuna), eggs, avocados, and wasabi peas! The wasabi peas tossed on top provide a nice kick and crunch to the salads, seriously, try it!

Another nice summer (or any season) meal I've been doing is shredded chicken in the pressure cooker; it's so simple. I cook 4 large boneless, skinless chicken breasts with some pre-packaged taco/fajita spice mix and a couple cups of water for about 30 minutes. I then shred them by pulling them apart using forks. We get about 4 meals out of this by using the chicken in burritos, soup, on salads, or whatever! 

I made some last week and we had burritos which is how I discovered squeezable sour cream at the grocery store! How have I missed this before!? Sour cream is just meant to be squeezed! Perfection.

Since returning from Alaska, I've made a new soap which is now available in the online store. This goats' milk soap, named Polar Smoke, is a mad mixture of warm cinnamon essential oil and cool peppermint essential oil with menthol crystals melted throughout!

The bottom black part (the smoke) has activated charcoal and is scented with cinnamon while the polar top is scented with peppermint! 

If you haven't tried showering with a soap that has menthol in it yet then you haven't experienced the refreshing, awakening shower that's perfect for hot summer days. 

Both the new Polar Smoke as well as the Peppermint Ice soap contain menthol and are fully stocked in the online store!

Thanks for reading and enjoy the longer days.


Friday, March 29, 2019

Thousands of Bars of Soap

"Big Order Request" read the subject line and innocently I clicked on the message. It was from a lady in California that I've done business with for many years. Her usual order of around 20 bars a month was about to increase.... "Would you be able to make 5200 bars by June 10th?" the email continued. The current date was March 14.

As she had a certain price in mind, I did what seemed logical to me and started figuring the costs involved in creating one bar of soap in the shape she requested. As it worked out, I could make a bar of soap and sell it to her for the price she wanted to pay and still make a profit but I also needed to know whether I could do 5200 of them in under 3 months! Needless to say, another spreadsheet was created.

As it turned out, yes I could make that many by June 10th however, I had a vacation planned in May and I still work full time at another job! I replied to her email that I'd guarantee delivery of 3000 bars by June 10 and maybe more but I didn't feel comfortable committing to 5200. She responded back saying she'd work with that.

So began my 'Soaping Spring' of which I'm still deeply in the throes of.

Besides the cost and time involved in making that much soap, there were logistics that needed to be worked out. Specifically, where was I going to store roughly 800 bars of soap at a time while they were curing for several weeks?

I had a curing rack that Jeff made years ago that I use for current production requirements; it holds a little over a hundred bars.

To make up the difference I needed something else and quick. Perhaps, all those planter boxes my son made last summer that were still in my laundry room could help?

Drastic measures were needed so after I set aside a couple for my garden projects, Jeff and I began converting the rest of the planter boxes to curing racks by stapling chicken wire to the tops.

In order to meet the production goals, I also needed to make 4 batches of soap a day or one quadruple batch. This required a larger bowl or bucket. It also required 7 more molds. I had one so I needed 3 more for my quadruple batch plus 4 more in case, on the weekends, I made two quadruple batches. A trip to the hardware store for mold making supplies was in order.

Me, staring at my supplies.
Finally, I needed supplies. I need gallons of olive oil, castor oil and rice bran oil, pounds of coconut oil, cocoa butter, and lye, and many, many ounces of essential oils AND I didn't want to pay shipping costs which would drastically cut into my profits.

Luckily I knew of a handcrafter's supply shop about a half hour drive from my house. A phone call to the store and a Saturday trip down the freeway to pick the supplies up and I was off to the races! Remind me sometime to blog about how mind blowing and nerve racking it is to drive on I-5 and over a major river with 50 pounds of lye in your trunk. On second thought, let's just forget about that....

Safely back home, I've been making soap everyday now for two weeks. I'm on schedule and under budget and happy to report that my initial calculations were very close to correct! I've still got another 6 weeks of soap making to go to meet my goal but I should have all 3000 bars complete by the time I leave for vacation!

I'm not sure whether this is a one time order or will be something ongoing. After I come up for air, I'll ask. For now, I'm heads down into soap making!

I had the online store pretty well stocked before I started this project so don't be bashful, you can still order soap!


Friday, March 15, 2019

Bonsai and Pots

Last July we made our first trip to the Salem Art Festival in Salem, Oregon. It was at that wonderful festival that I purchased my pre-bonsai Chinese Elm tree.

A pre-bonsai has been partially trained and is significantly less expensive than a true bonsai. A pre-bonsai, therefore, is a great way for a beginner to learn the art of bonsai. Since I am the definition of beginner when it comes to bonsai, I purchased this book.


Purchasing the tree in the middle of summer meant there was little I needed to do besides keep it watered and fertilized. Much to my delight, I kept the tree alive and growing over the hot summer we had last year. When the weather started to turn in late fall, I moved the tree up next to the house where it sat until recently.

Over the long winter I researched new pots for transplanting the tree. Rather than purchase just any bonsai pot though, I decided to ask my friend at work if he could make one. I've mentioned Bob's work before as he's made just about all my plates and bowls (pictured). Lucky for me, he bought a kiln last fall and can now churn out the pottery any time I want he wants!

Just look at the wonderful pot he made for my tree! His work is seriously beautiful.

Alas, winter in Portland this year seemed to really hang on and we had multiple late February - early March snows, however, the weather did finally seem to turn the second weekend of March and I was more than ready to try my hand at re-potting my bonsai.

Armed with my book knowledge, I started by preparing my new pot, covering the bottom holes with some garden fabric I had already.

I then fed a couple 6-8 inch pieces of wire through the bottom small holes and through the fabric. Since the typical bonsai pot is rather shallow, the wire is used to tie the roots to the pot.

Now the fun part; I get to use my tiny tool set! After cutting around the edge of the pot the tree was in, I carefully lifted it out and used the tiny rake to gently untangle the roots.

It became more evident once the roots were untangled as to where to cut. In this case, I cut all the lanky, long straggler roots then rinsed the root ball.


I then placed the root ball in the pot around the wires. Aesthetically, it's important to place the tree slightly off-center in the pot. Next, I gently twisted the wires securing the tree to the pot.

Finally, I added soil to cover the tiny exposed roots and watered, waiting to fertilize until the growing season starts in earnest.

Some bonsai trees require very specific soil, in the case of the Chinese Elm, I was able to just use a basic bonsai soil mix.
I gave my tree a little trim to the branches and placed it back  against the house to protect it until the fear of frost is over, hopefully soon! Time will tell on whether this re-potting was successful, fingers are crossed!

**Update** I'm happy to report, my bonsai re-potting was successful!

It looks so nice in it's new pot.


Friday, February 22, 2019

A Life Changing Purchase

I've been thinking a lot about stuff lately; stuff I own, stuff I want, stuff in the past I've had. I've been doing that because last week I put money down on a purchase that I think will be life changing.


I'll get to what I bought in a minute but after putting money down on it, I got to thinking about what stuff in my life I've had that has changed my life in a significant way.

I purchased a pressure cooker a couple years ago (I wrote about it here and here) and love cooking with it. It's changed how I cook some foods but I wouldn't call it life changing.

What THING have you purchased that has changed your life? A  car? The very best Mexican chocolate you've ever tasted? A book? A luxurious bar of goats' milk soap? --sorry, shameless promotion!

As I reflected on this and because of what I purchased, I realized that all the bikes I've owned in my life have been life changing. Not surprisingly the purchase I made last week was a bike!

This isn't just any bike though, this is an investment in the future of urban transportation; a cultural disrupter! I put money down on an ELECTRIC BIKE and I'M STOKED!

Ever since I saw the Vanmoof electric bikes several years ago I wanted one. I rode an electric bike in Italy, although it was more a large trike than a bike. Riding that trike though, was a blast!

A couple years ago when my non-electric commuter bike had a flat tire, I took it to the electric bike shop by my work to get it repaired. As it was being repaired I admired their bikes. The salesperson gave me a coupon for an hour free rental on a couple of the bikes. Later that summer I used the coupon and test rode an electric bike. I was hooked! Talk about exhilarating!

Electric bikes are typically placed into four categories. Class One electric bikes are pedal assist bikes, meaning they're not going to propel you forward unless you pedal. What they do is give you a little oomph to get up a hill or keep you moving faster than you would without the assist. Their maximum speed is about 20 mph.

Class Two electric bikes come with throttles, Class Three allow you to reach a speed over 28 mph with pedal assist, and Class Four are mopeds or motorcycles.

My new bike is a Class One but the big difference between my new bike and the bikes I've test ridden is, well simply put, IT LOOKS COOL! Seriously cool. REALLY.  Watch the video and tell me you aren't smitten!


It also has a built in security alarm and lights, will go 90 miles on a single charge, and takes 4 hours to fully charge!

I put $100 deposit on my new bike but I won't get it until June or July. It will be mailed to my house in a box, fully assembled except for the pedals. I'll adjust the seat and handlebars, add the pedals, download the phone app (which is used to help lock and unlock the bike), and ride into the future!

I'll be sure to let you know what I think of the new bike along with plenty of pictures. Or, maybe I will love it so much I'll only break from riding it to eat, sleep, and charge it?

The bike is not cheap and I'll probably sell at least one of my other three bikes and probably even my car, which is seventeen years old, but life changing? No doubt about it.

Friday, January 25, 2019

Fireplace Doors Replacement Project

I have a quick and easy project to share that we completed last October. I neglected to share it back then because life got in the way and then the holidays, yada yada yada.

Anyway, if you have ever thought about replacing the doors (or adding some if you don't have any) on your fireplace, I hope this post gives you encouragement to do so because it's easy.

Upstairs fireplace
In our home, we have two fireplaces, the one upstairs which I converted to gas, already has fireplace doors on it, and the one downstairs in my son's bedroom which we never use.

Many years ago I removed the old doors that were on the downstairs fireplace to paint the brick and I never put them back (they were 1970's chrome and black doors that screamed 1970) only the screen was left in place. Since we never used the fireplace, I shoved something up the chimney to alleviate any drafts. Well, many windstorms later, whatever I shoved up there was gone and cold air was coming in and heat was escaping out. So, last October I decided to do something about it before winter hit. Naturally, I started googling 'How to replace fireplace doors?'

There are many videos on YouTube that document the process, but the take away is the doors are attached via a couple clamps to a lintel bar at the top (which if you're replacing a door this will already exist) and with two screws and brackets to the bottom of the fireplace.

Image from:
https://www.thisoldhouse.com/how-to/how-to-install-glass-fireplace-doors
Here's a nice schematic that I pulled from a This Old House post that will walk you through the process and is worth a read.

Most doors that you purchase from a fireplace store, Home Depot or Lowes will fit openings within a specified range and will come with attached screens. You'll want to measure the height and width of the opening of your firebox then find a door that's size-range will fit.


In our case, I went with this door from Home Depot for $399.

I don't have a lot of pictures of the process but I've included a few pictures of what we were dealing with before the new doors and after they were installed.

Before was just a bare screen which was attached to the lintel bar with a couple clamps.

After removing the screen, we installed the new doors. Most doors come with insulation that is placed behind the top and sides of the doors.

This whole project took about an hour and a half to complete. Honestly, I don't know why I waited so long to do it.

The new doors look so much better and are definitely saving money on heating costs.

If you're on the fence about trying this project yourself, don't be. It really is easy and well worth the effort.